When you need this page
If your Provider node runs on an Apple Silicon Mac and is going to use oMLX to serve inference tasks, follow this page first to start the oMLX service and model instance. oMLX exposes an OpenAI-compatible interface, and on the Provider Agent side you need to use --api-format omlx.
Here, oMLX refers to an inference server aimed at macOS and MLX models. Apple's official mlx_lm.server can also provide a local HTTP service similar to the OpenAI Chat API, but its production capabilities and context-window configuration options are less explicit than oMLX; this page describes the oMLX flow by default.
Supported systems and characteristics
oMLX is primarily aimed at Apple Silicon Macs. The official documentation requires Apple Silicon M1 or newer and macOS 15+; 16GB of memory is the minimum threshold, while 64GB+ is more suitable for larger models and long context.
Main advantages:
- Natively aimed at macOS and MLX, suitable for Apple Silicon unified-memory machines
- Supports OpenAI-compatible
/v1/chat/completionsand Anthropic-compatible/v1/messages - Supports multi-model serving, a menu bar app, an Admin Dashboard, and model management
- Supports continuous batching and SSD-tiered KV cache, suitable for scenarios with many repeated prefixes such as coding agents
- Can reuse an existing LM Studio model directory, provided the model format is compatible
Main limitations:
- Not applicable to Windows, Linux servers, or NVIDIA/AMD GPU machines
- Requires MLX-format models; you cannot directly use Ollama models or plain GGUF as an oMLX model directory
- oMLX is a third-party project, not Apple's official MLX project
Installing oMLX
It is recommended to download the DMG from the oMLX website, drag it into Applications, and launch it. On first launch, follow the welcome screen to select a model directory, start the service, and download models.
You can also install from source:
git clone https://github.com/jundot/omlxcd omlxpip install -e .Start the service:
# Before starting, set max_context_window per the model's requirements in the Admin Dashboard or config fileomlx serve --model-dir ~/modelsThe default service address is:
http://127.0.0.1:8000If your version supports Homebrew, you can also install it per the project README or release notes:
brew tap jundot/omlx https://github.com/jundot/omlxbrew install omlxPreparing the model
The model names in the Token supply examples, such as qwen3.6:35b and gemma4:26b, are the platform model codes used when starting the Provider Agent. At runtime, oMLX needs an MLX-format model, model directory, or model alias; the "model name" shown in the console is used to search for and download the model, while the "model ID" is used for the OpenAI-compatible model identifier that oMLX exposes and for the Provider Agent's --runtime-model-id.
In practice, first open the Provider API Keys page, select the target model and the oMLX inference framework in the Token supply examples, then click "Copy model name" and "Copy model ID" respectively. The model name is used to search for and download in oMLX or Hugging Face; the model ID is the model in /v1/models and in verification requests, and is also the Provider Agent's --runtime-model-id / PROVIDER_AGENT_RUNTIME_MODEL_ID.
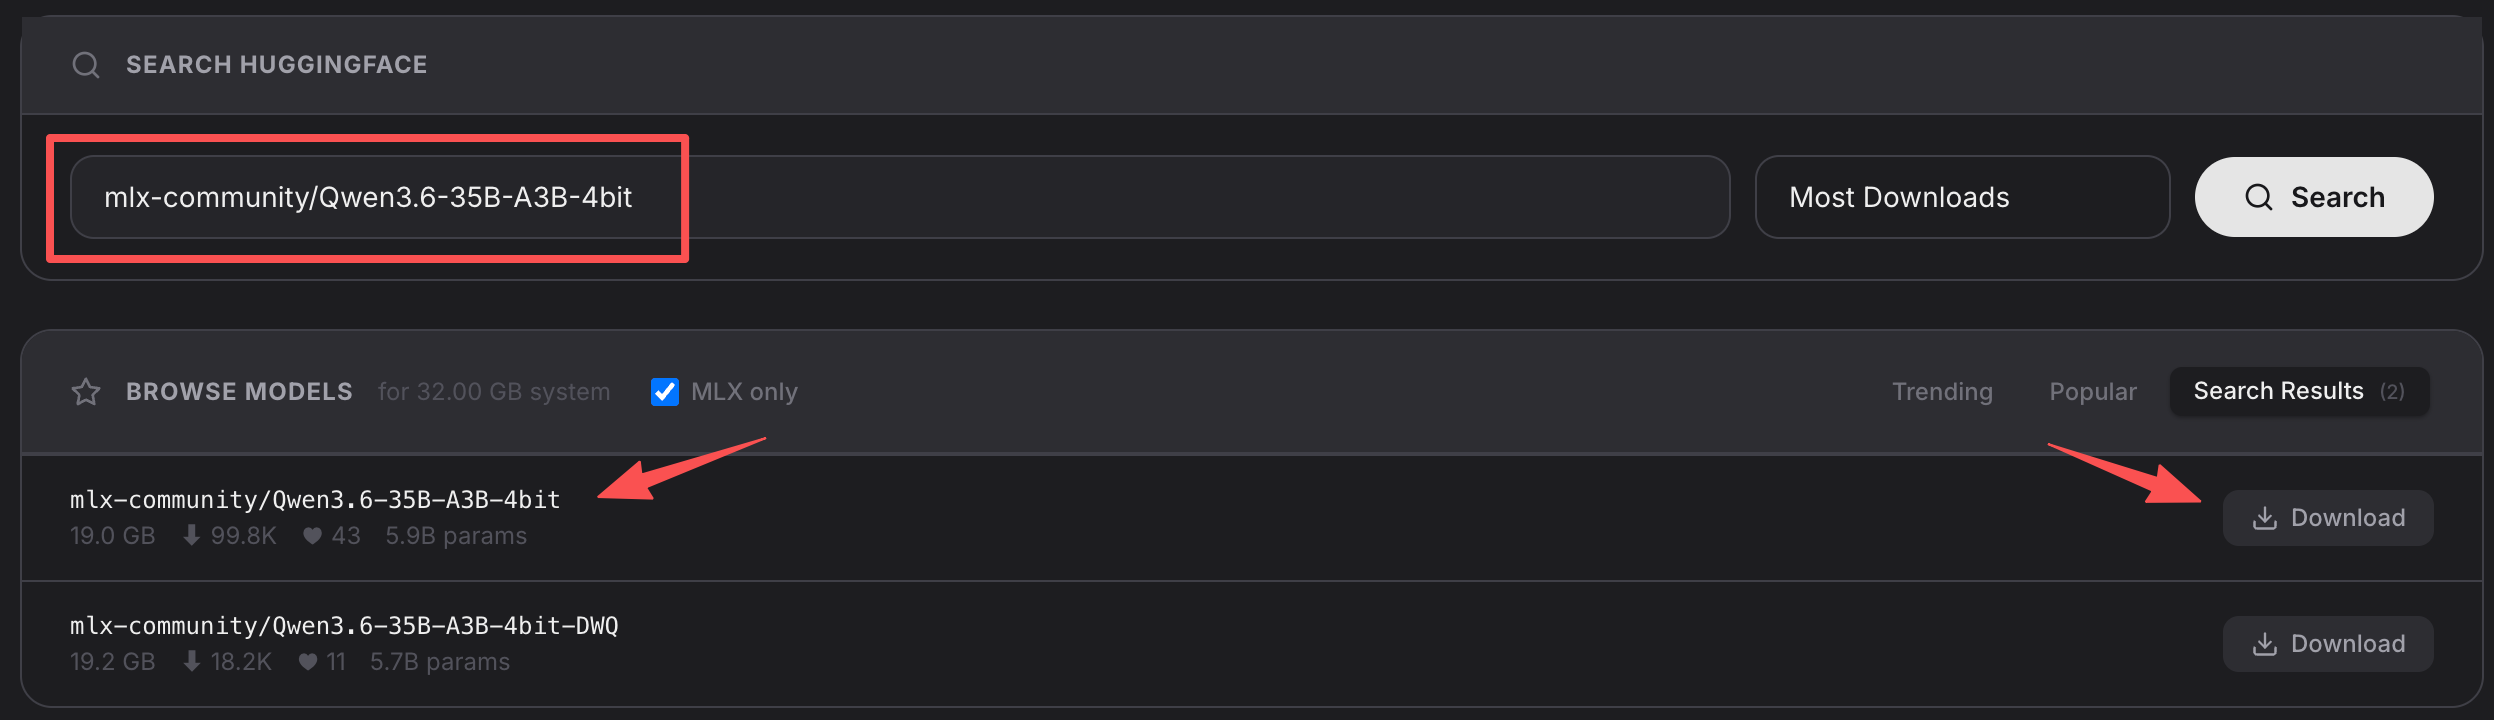
Then open the Models page in the oMLX console, enter the copied model name in the Search HuggingFace search box, keep the MLX only filter on, and click Search. When the search returns a match, click Download on the right of the corresponding model. The mlx-community/Qwen3.6-35B-A3B-4bit in the screenshot is only an example of how to operate; the actual download item must be based on the model name you copied, the oMLX search results, and the /v1/models return.
The recommended approach is as follows; ultimately, use the values shown as "model name / model ID" on the page:
| Token supply example model name | oMLX model name | oMLX model ID | Notes |
|---|---|---|---|
qwen3.6:35b | mlx-community/Qwen3.6-35B-A3B-4bit | Qwen3.6-35B-A3B-4bit | Based on the actual return from the oMLX Dashboard and /v1/models |
gemma4:26b | mlx-community/gemma-4-26b-a4b-it-4bit | gemma-4-26b-a4b-it-4bit | Based on the actual return from the oMLX Dashboard and /v1/models |
Setting the context window
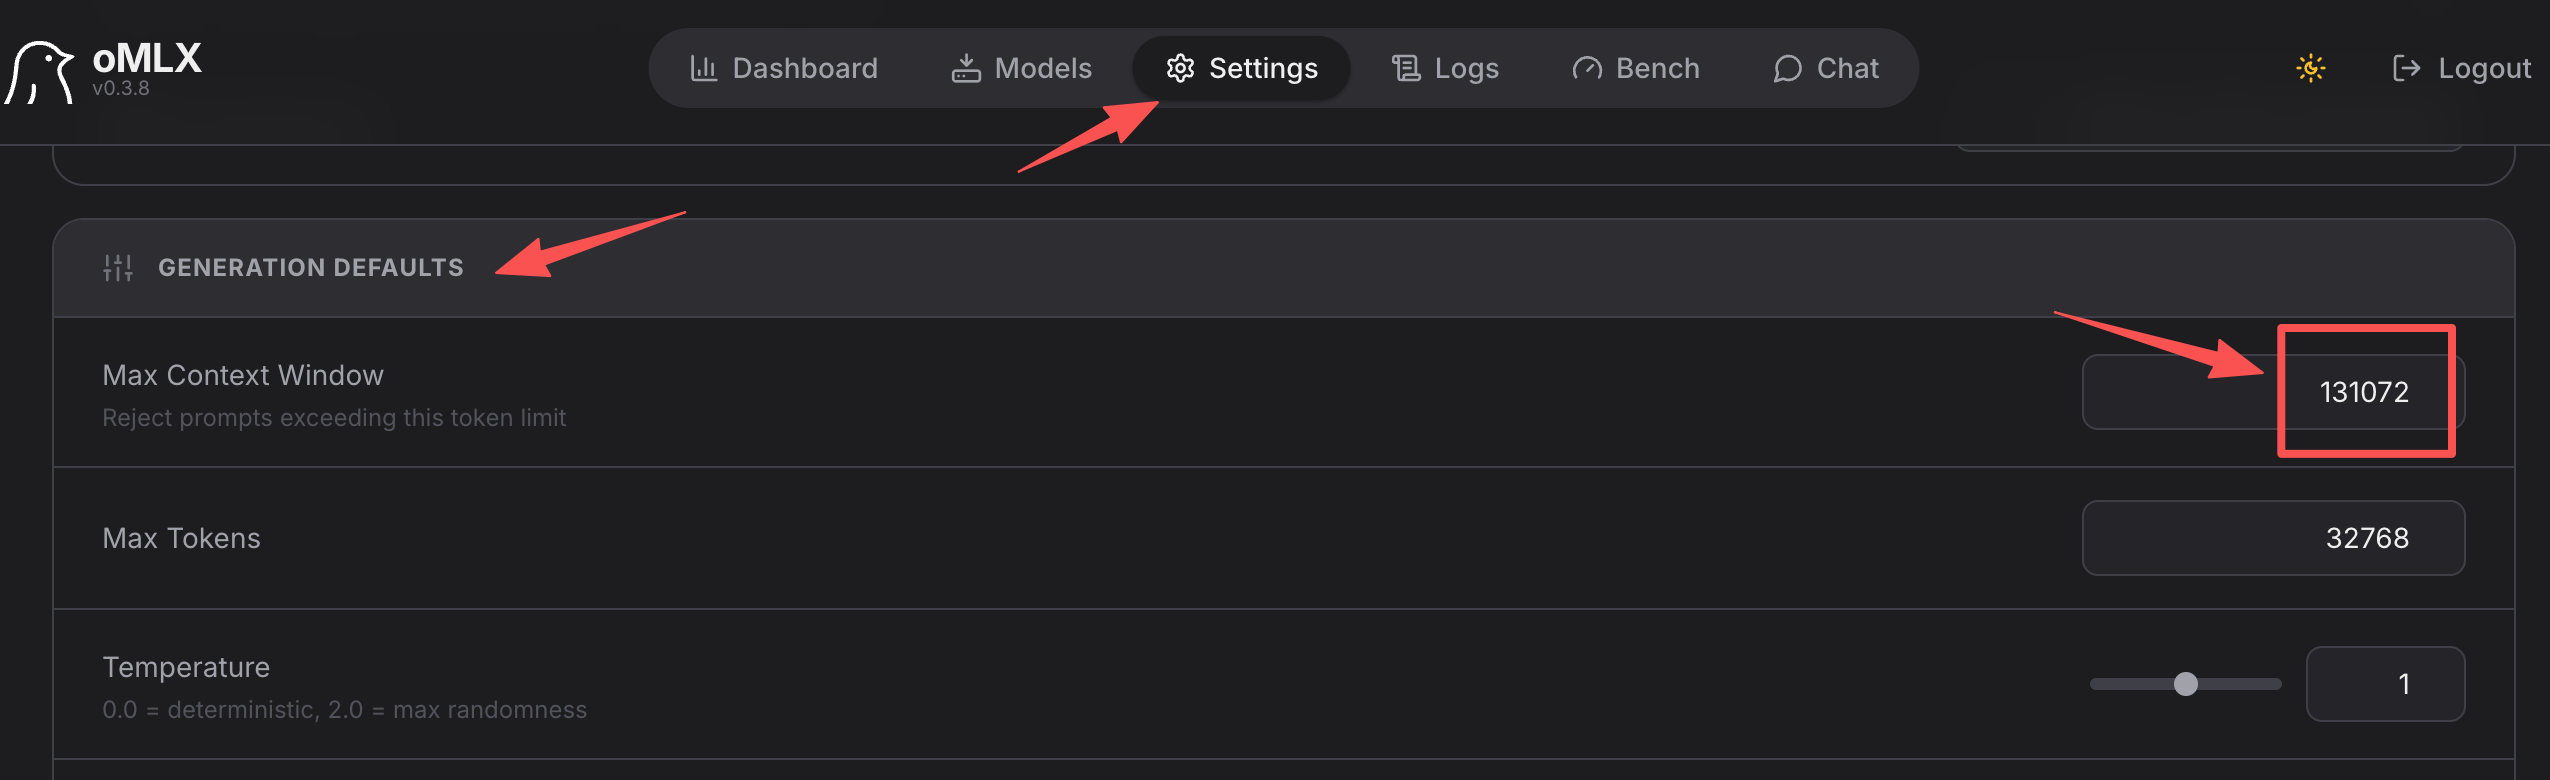
The corresponding oMLX field is max_context_window. This value should be set according to the target model's requirements, rather than fixing all models to the same number. The common conversion is: 128K corresponds to 131072 tokens, and 256K corresponds to 262144 tokens.
It is recommended to go into Settings in the oMLX Admin Dashboard, find Max Context Window in the Generation Defaults area, and fill in the context length according to the corresponding model's requirements. Some versions may also support overriding the context window in the per-model settings; if both a global default and a model-level setting exist, the model-level setting takes precedence.
If you maintain an oMLX config file, set the max_context_window of the corresponding model to the same token count. The config file path and hot-reload behavior may differ across versions; prefer the configuration displayed and exported by the Dashboard of your current version. After configuring, it is recommended to restart the oMLX service, then verify /v1/models and a short request.
Notes:
max_context_windowis the context window that the inference framework allowsmax_tokensin the OpenAI request body is only the per-call generation limit, not the context window- SSD KV cache is a caching and reuse mechanism; it is not the same as the maximum context that the model was trained to support
- If the model itself does not support the target context length, setting a large context window is still unreliable
Verifying the oMLX service
View the model list:
curl http://127.0.0.1:8000/v1/modelsRun a non-streaming inference. Use the actual model ID or alias seen in /v1/models for model:
curl http://127.0.0.1:8000/v1/chat/completions \ -H "Content-Type: application/json" \ --data-raw '{ "model": "Qwen3.6-35B-A3B-4bit", "messages": [ { "role": "user", "content": "Reply in one sentence: the oMLX service is available." } ], "max_tokens": 64, "temperature": 0.2 }'If you enabled an oMLX API Key, add to the request:
-H "Authorization: Bearer <OMLX_API_KEY>"Starting the Provider Agent
Once the oMLX service is available, run preflight first:
./token-provider-agent preflight start \ --model qwen3.6:35b \ --base-url http://127.0.0.1:8000 \ --api-format omlx \ --runtime-model-id Qwen3.6-35B-A3B-4bitAfter preflight passes, start it for real:
./token-provider-agent start \ --api-key stp-... \ --model qwen3.6:35b \ --base-url http://127.0.0.1:8000 \ --api-format omlx \ --runtime-model-id Qwen3.6-35B-A3B-4bitIf oMLX has an inference-framework API Key enabled, also pass:
--runtime-api-key <OMLX_API_KEY>