When you need this page
If you want to use the LM Studio desktop app to handle inference tasks for a Provider node, follow this page to download models and set the context length in the graphical interface, then start the LM Studio local server. LM Studio exposes an OpenAI-compatible interface, so on the Provider Agent side you need to use --api-format lmstudio.
The model names in the Token supply examples, such as qwen3.6:35b and gemma4:26b, are the platform model codes used when starting the Provider Agent. The console shows both a "model name" and a "model ID": the model name is used to search for and confirm the model in LM Studio or Hugging Face; the model ID is the identifier returned by LM Studio's /v1/models, and the one used by the Provider Agent's preflight and actual requests.
Supported systems and characteristics
LM Studio is a good fit for local Providers who want to manage models through a graphical interface. The official system requirements currently cover mainly:
- macOS: Apple Silicon Macs; Intel Macs are not currently supported
- Windows: x64 and ARM; x64 requires AVX2
- Linux: x64 and ARM64, distributed as an AppImage; officially requires Ubuntu 20.04+
Main advantages:
- Both installation and model downloads can be done through the graphical interface
- Supports Hugging Face search, GGUF models, and MLX models on Apple Silicon
- Built-in OpenAI-compatible endpoints such as
/v1/modelsand/v1/chat/completions - Runs locally by default, suitable for desktops or small workstations
Main limitations:
- Large models and long context windows depend heavily on RAM, VRAM, and quantization format
- There is no complete official NVIDIA, AMD, or Intel GPU compatibility matrix, so actual performance must be measured on your own machine
- The GUI is convenient, but multi-machine deployment and bulk operations are less direct than with vLLM or SGLang
- OpenAI-compatible behavior is not exactly identical to cloud OpenAI, so complex parameters must be tested
Installing LM Studio
Open the LM Studio download page and download the installer for your system.
After installing, open LM Studio and confirm you can reach the Chat, Discover, My Models, and Developer pages. If this is your first install, it is a good idea to first load a small model on the Chat page for a trial run, confirming that model inference and your GPU/RAM configuration work correctly.
Later, downloading models, adjusting model load parameters, and starting the local inference service are all done from the corresponding pages via the left navigation. If you cannot find a configuration entry point, first check the model management, model search, and Developer entries in the left navigation bar; model downloads are done on the Discover / model search page, while the inference service and runtime context window are adjusted on the Developer local server page.
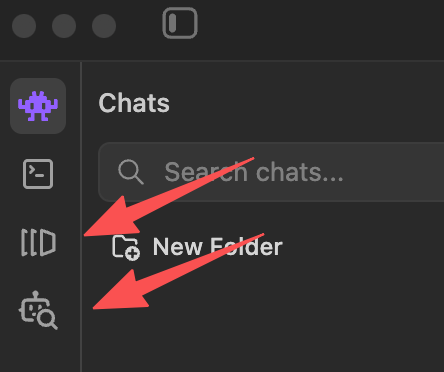
Downloading models
Go to the Discover page in LM Studio and enter a model keyword, a full user/model name, or paste a Hugging Face model URL into the search box.
In practice, first open the Provider API key page, select the target model and the LM Studio inference framework in the Token supply examples, then click "Copy model name" and "Copy model ID" separately. The model name is used to search for, download, and load the model; the model ID must be visible in LM Studio's /v1/models, and it is also the Provider Agent's --runtime-model-id / PROVIDER_AGENT_RUNTIME_MODEL_ID.
You can enter part of the model name when searching, but before downloading you must confirm at the top of the model details on the right that the full model name matches the copied model name, for example qwen/qwen3.6-35b-a3b. Do not rely only on the display name in the list, and do not accidentally pick a community GGUF variant with the same name; if the interface offers a copy button, prefer copying the full model name from the details page and then double-checking.
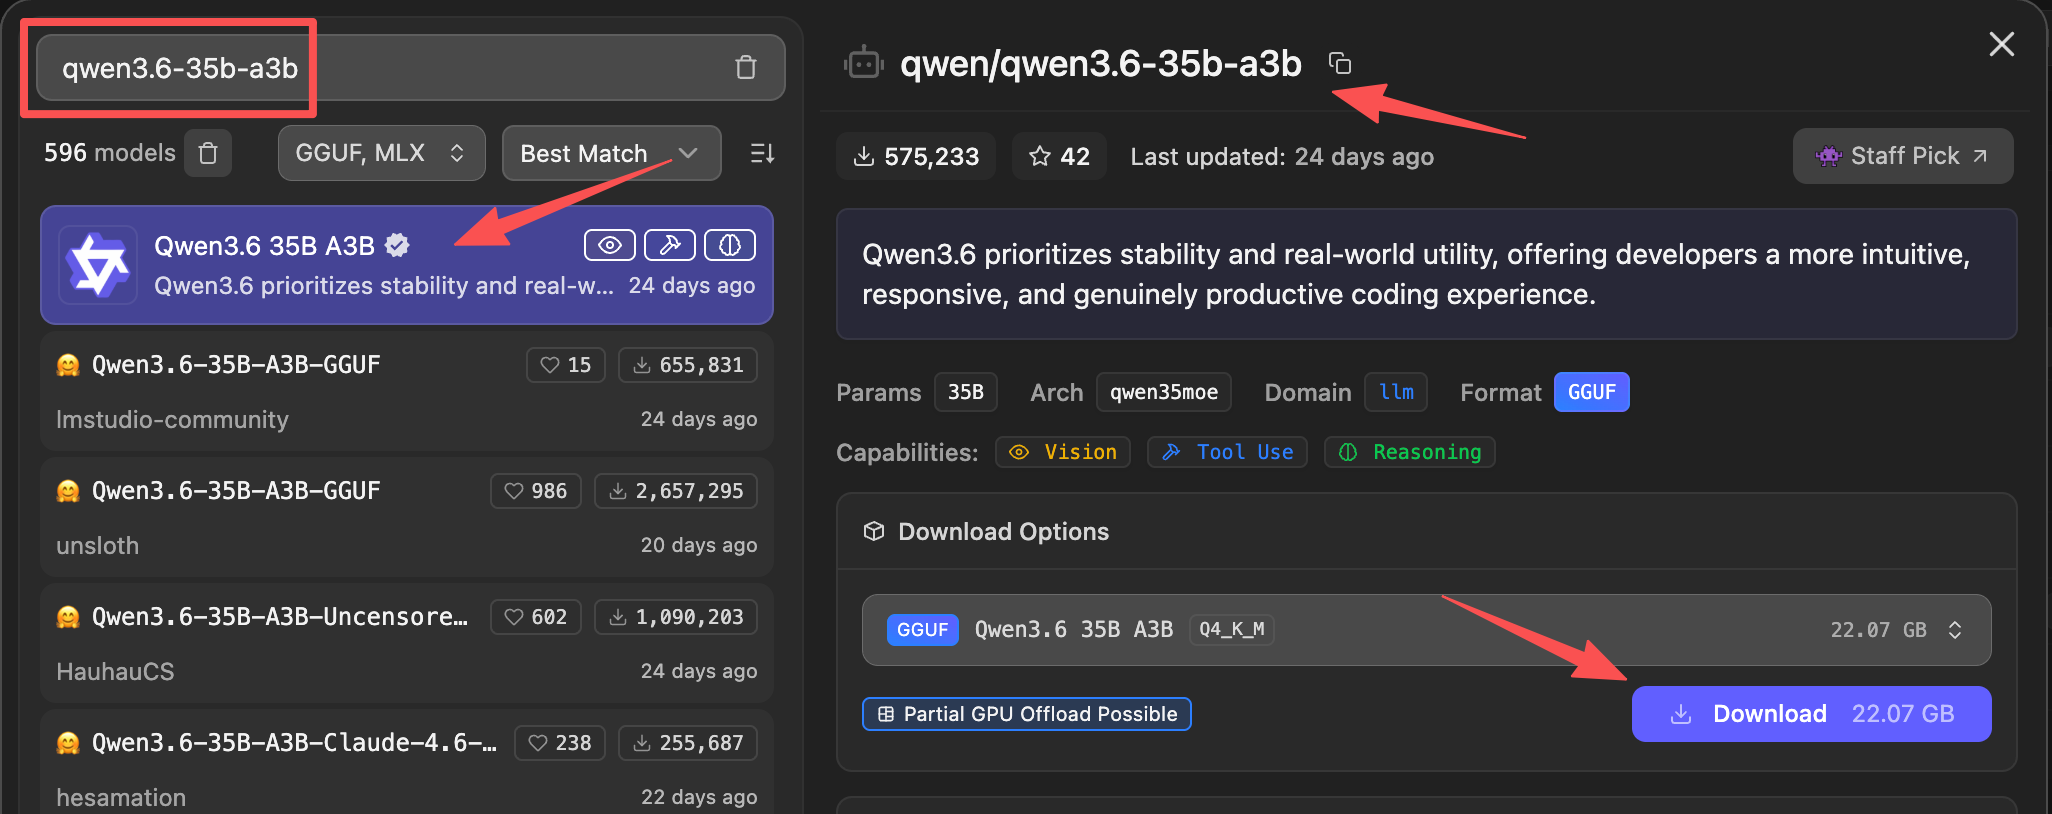
The example model mappings are as follows; the authoritative values are those shown as "model name / model ID" on the page and what your local /v1/models actually returns:
| Token supply example model name | LM Studio model name | LM Studio model ID | Notes |
|---|---|---|---|
qwen3.6:35b | qwen/qwen3.6-35b-a3b | qwen/qwen3.6-35b-a3b | Defer to the LM Studio model library and actual download result |
gemma4:26b | google/gemma-4-26b-a4b | google/gemma-4-26b-a4b | Defer to the LM Studio model library and actual download result |
After the download completes, go to the My Models page and confirm the model appears in the local model list.
Setting the context window
If you want to permanently use a fixed context window when loading models later, first open Settings in the bottom-left, open Model Defaults, choose Custom value under Default Context Length, and enter the context window size required by the target model. This setting becomes the default for subsequently loaded models; if the maximum context actually supported by the model is lower, LM Studio uses the lower value according to the model's capability.
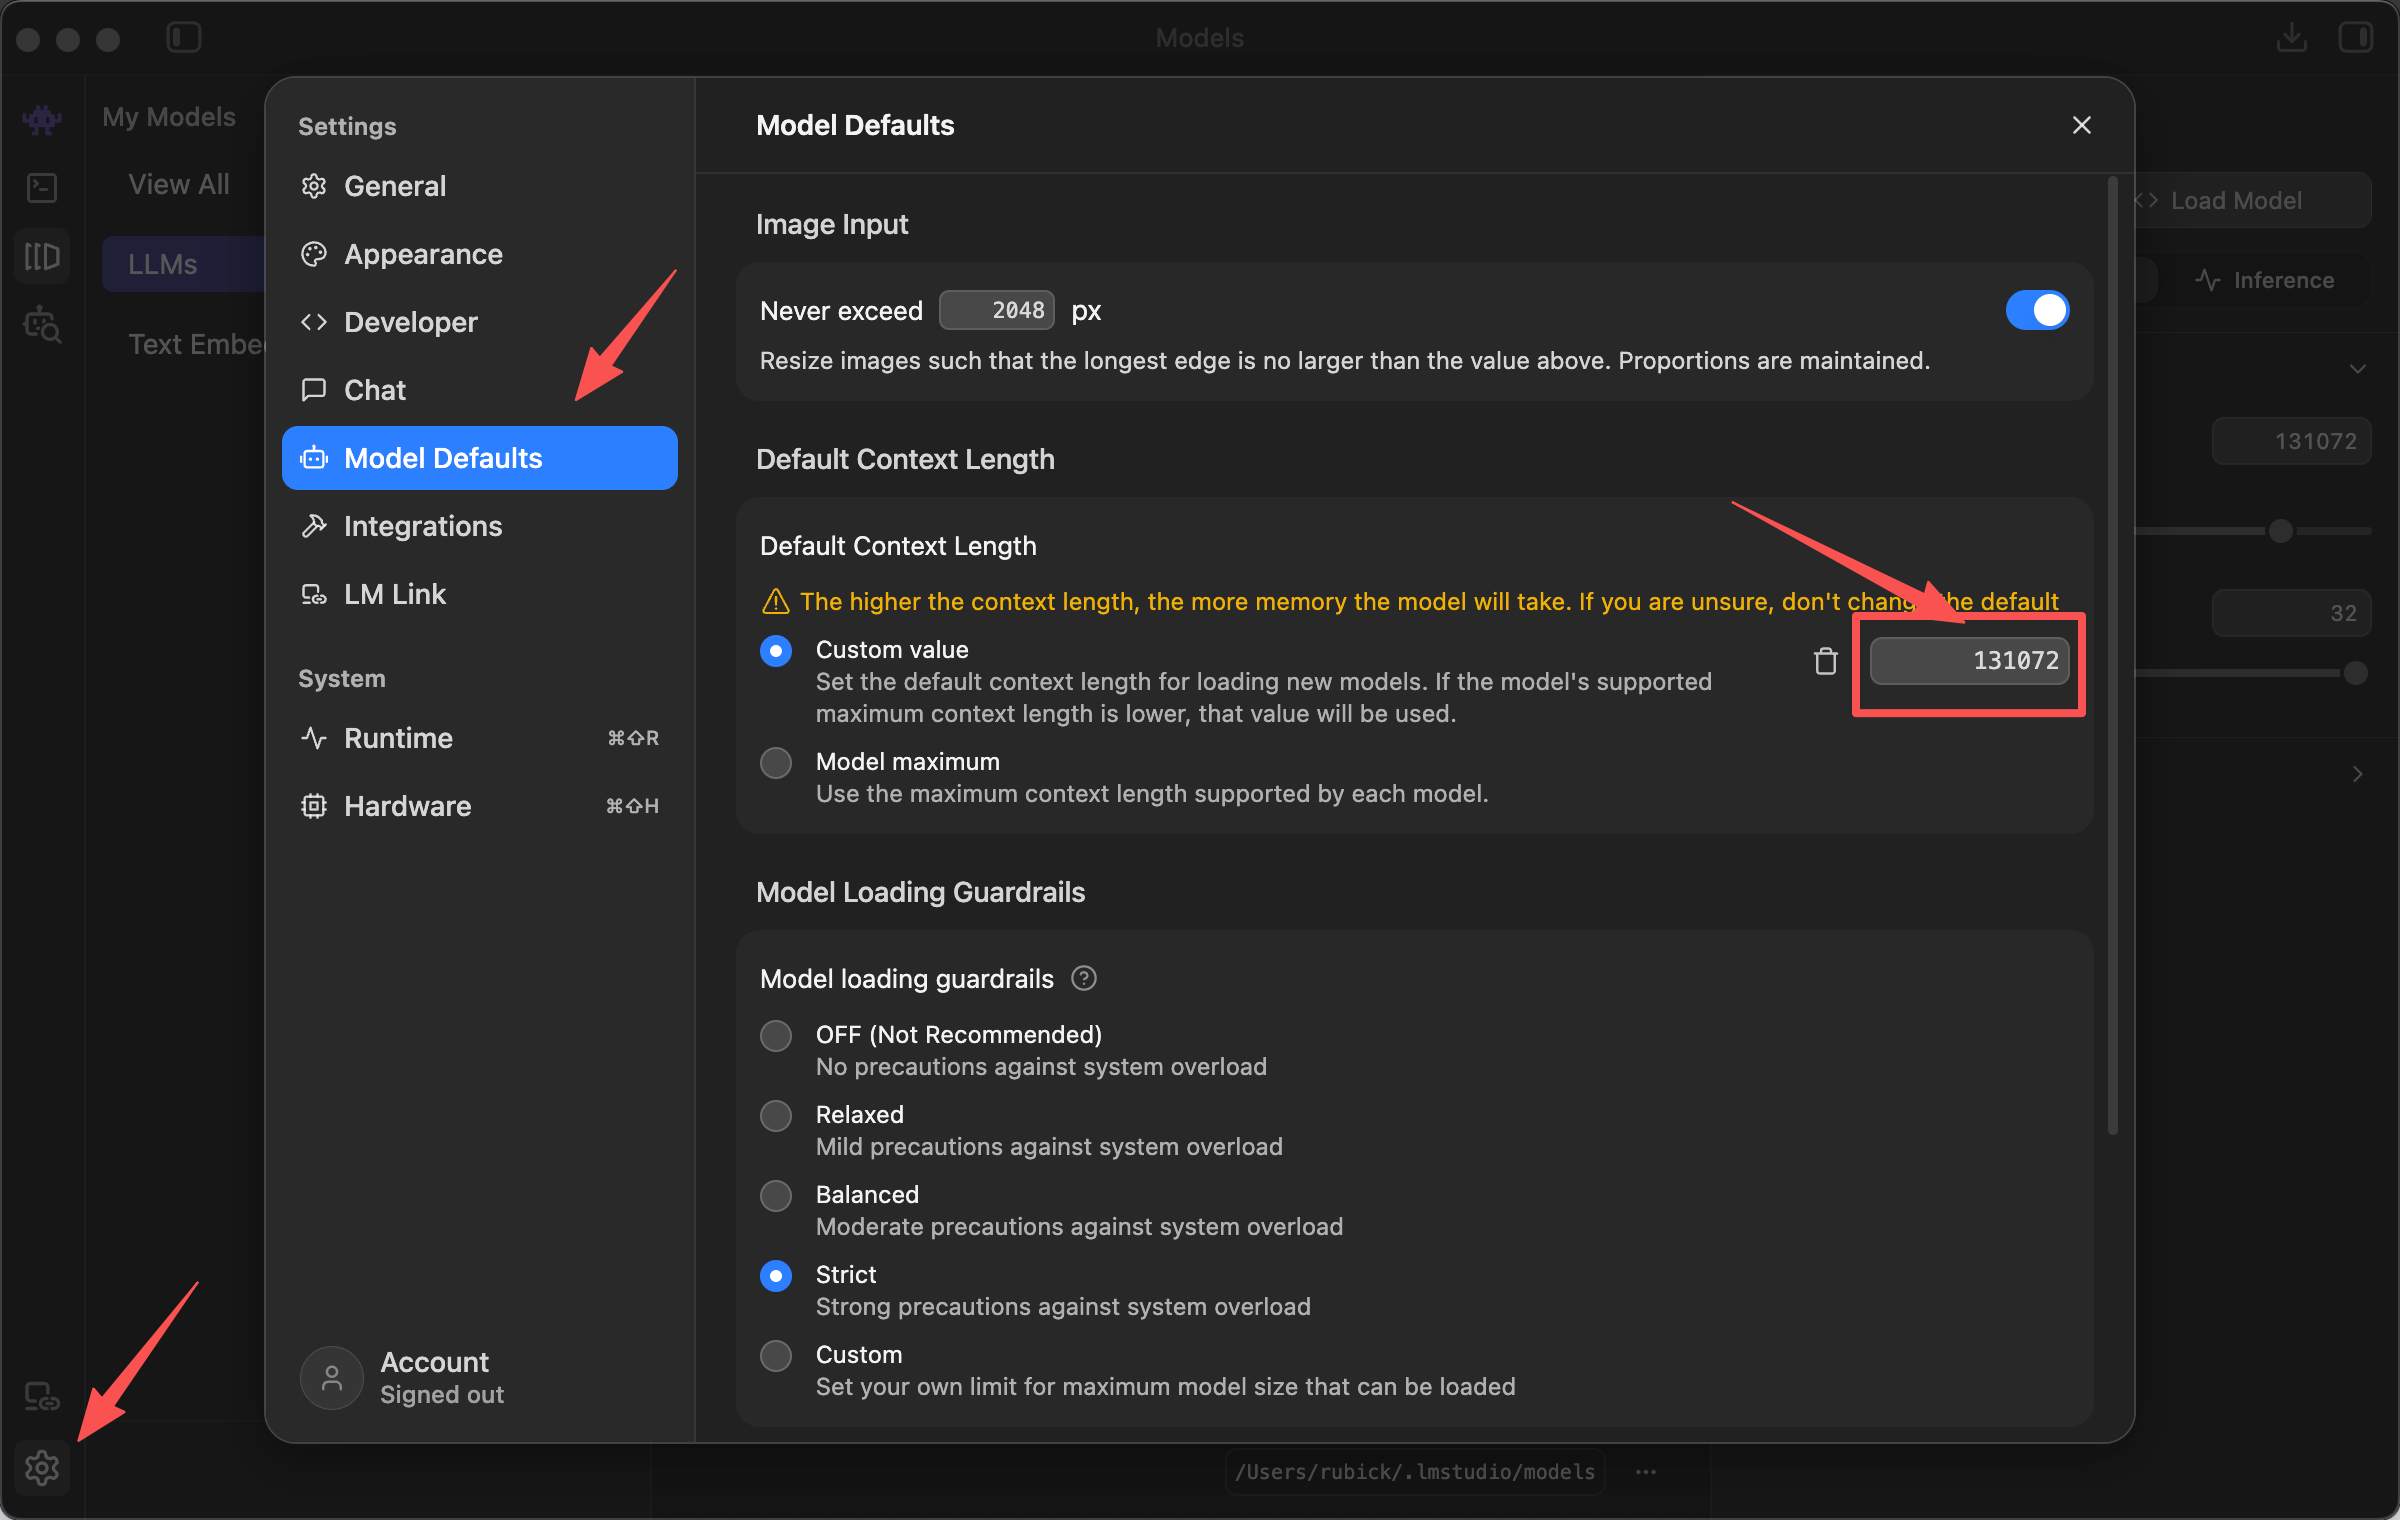
You can also set default load parameters for a single model. Go to the My Models page, click the gear button next to the target model, and in the default load settings set Context Length or Context Size to the "context window" size required by the target model. This value should not default to the same number for all models; it should follow the model card, the actual downloaded model, and the capability shown by LM Studio.
If the target model explicitly supports a 256K context window, you can set:
262144This represents a 256K context window. After saving, the next time you load that model from the Chat page or the API service, this default value is used first. If the target model requires 128K, set it to 131072; fill in other models according to their respective requirements.
You can also temporarily adjust the Load Settings before loading a model, changing Context Length to the number of tokens required by the target model, and adjusting options such as GPU Offload and Flash Attention as needed. Load the model after configuring.
If you load a model directly for the local server on the Developer page, you can also adjust Context Length in the Context and Offload area on the right. If the page prompts that a reload is required after the change, click Reload to apply changes so that the new context window configuration takes effect.
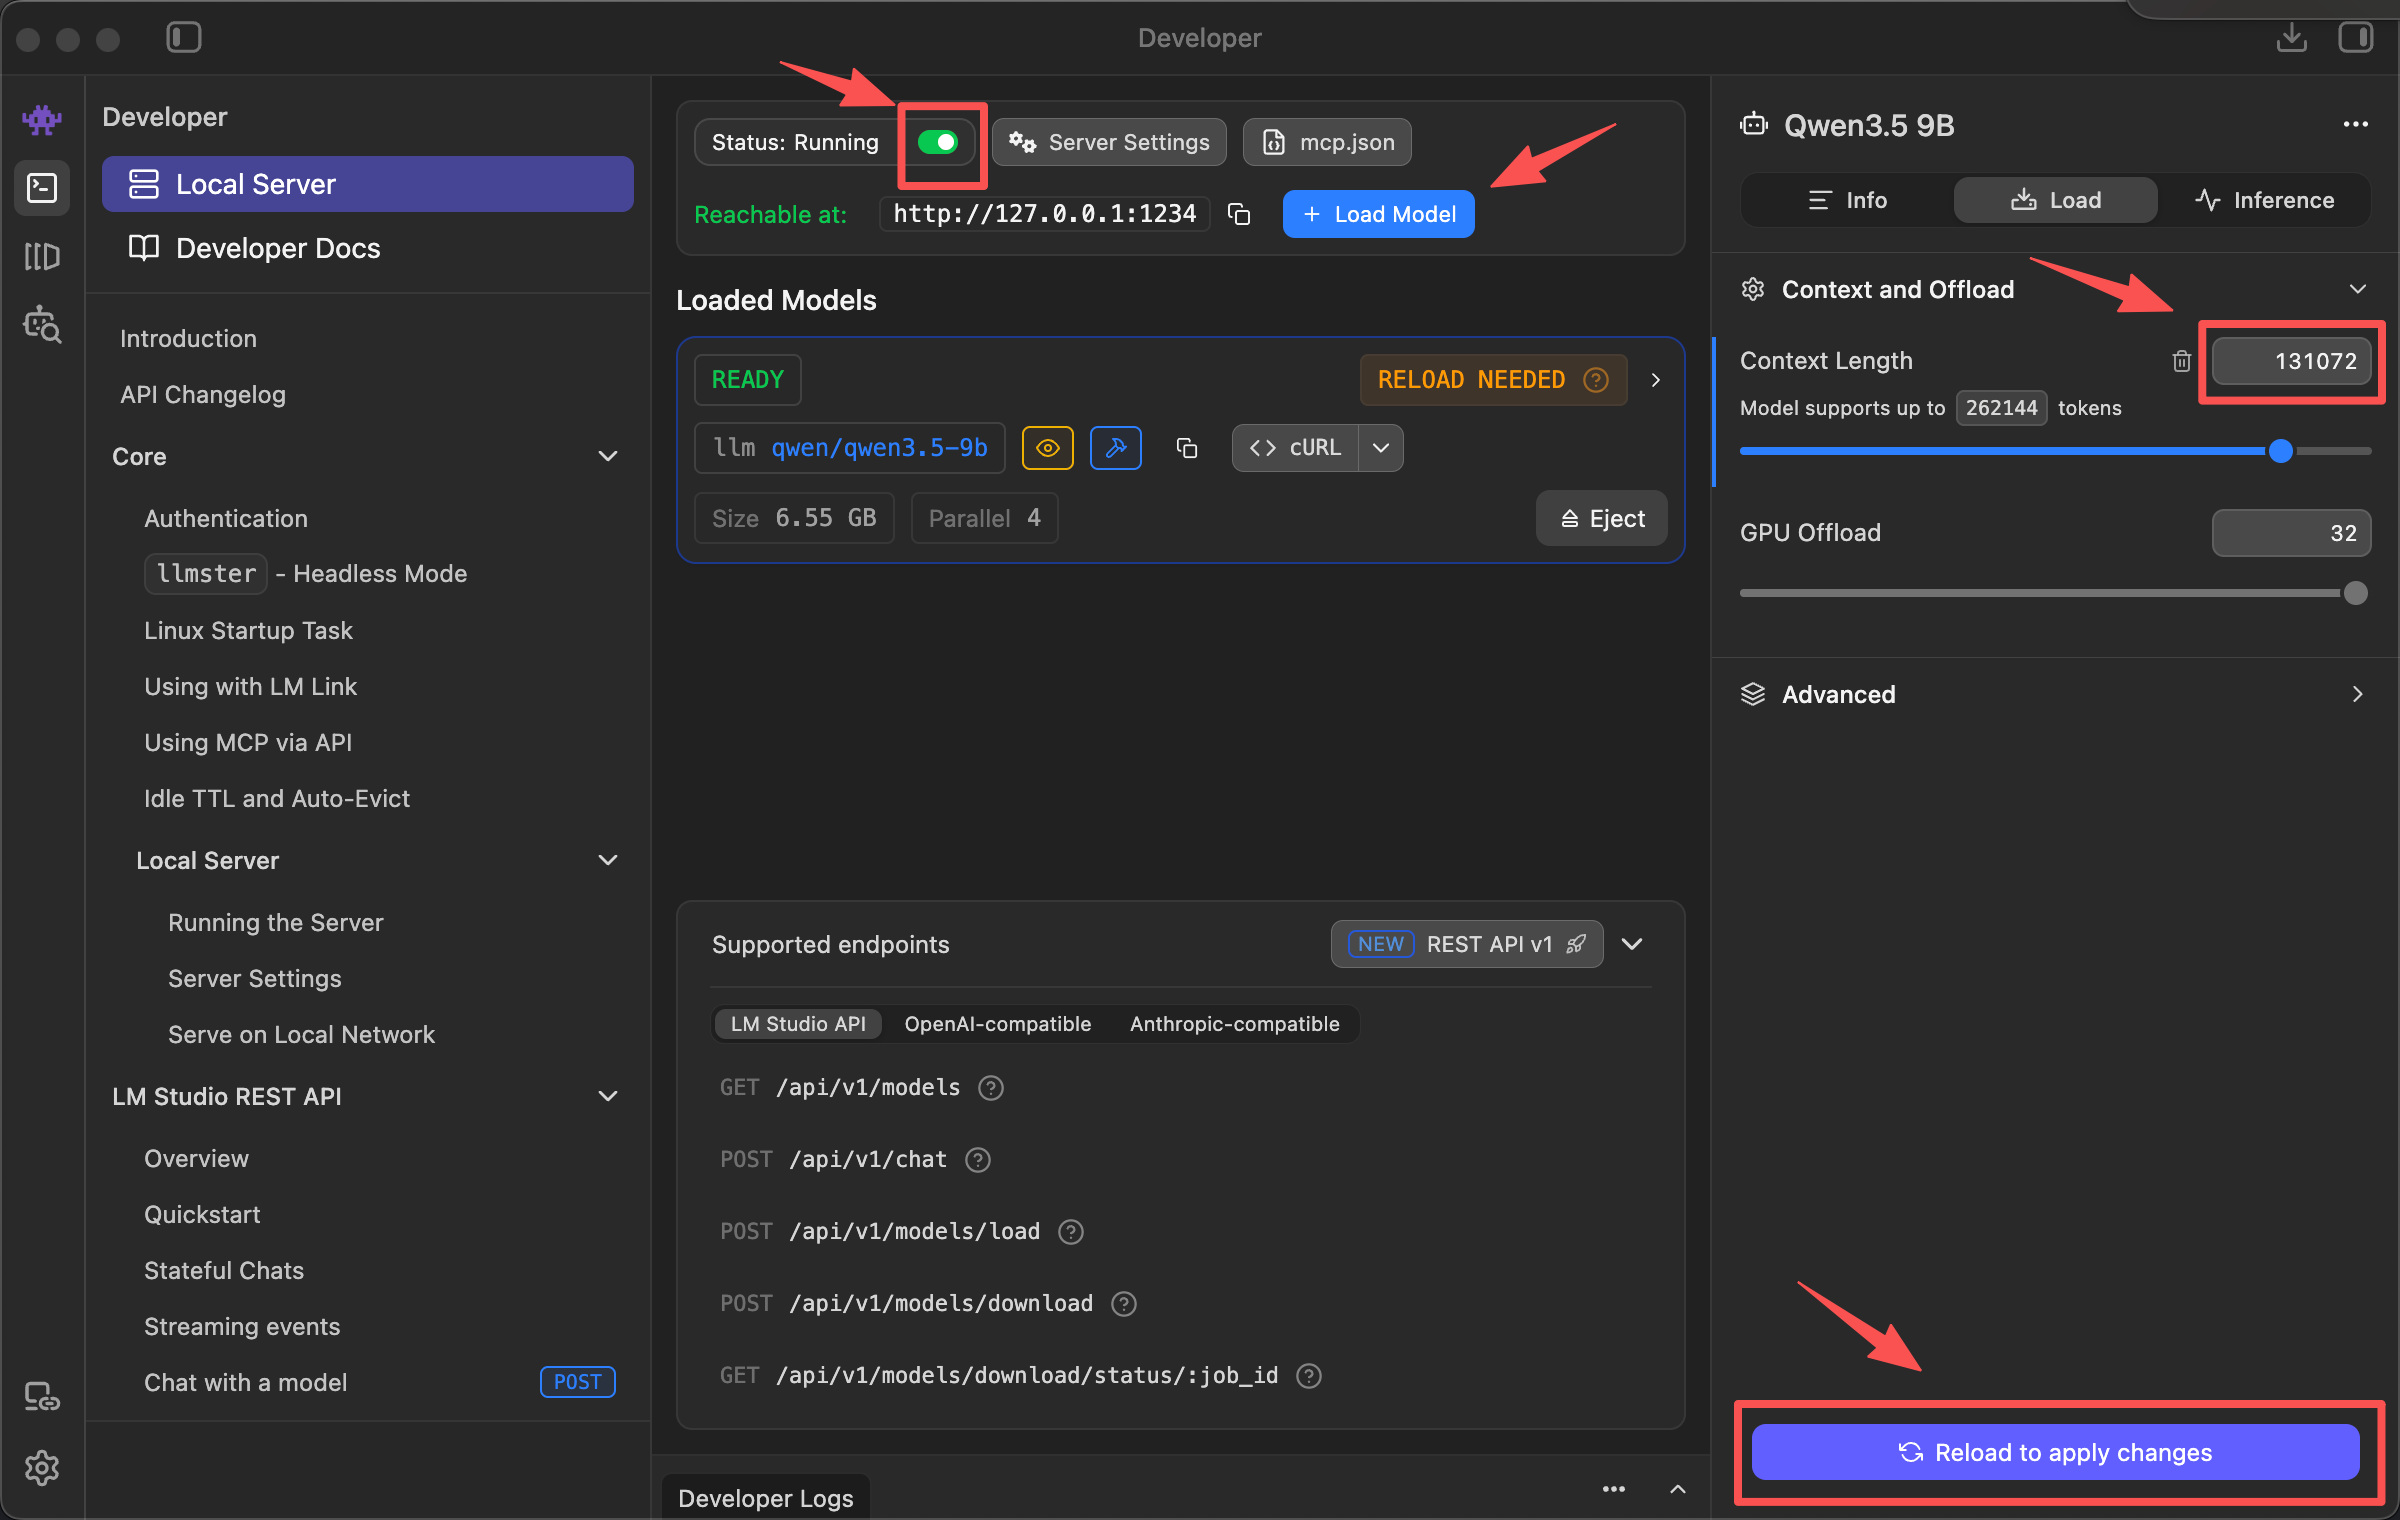
Notes:
- Context Length is the context window used when loading the model
- The
max_tokensin an OpenAI request body is only the maximum number of tokens generated for that single request - The model itself must support the target context window size you set; the larger the context, the higher the KV cache usage
Loading the model
Go to the Chat page, open the model loader, and select the model you just downloaded. Before loading, confirm that Context Length in Load Settings is set according to the target model's requirement, then click load.
If you want to use gemma4:26b, similarly select the local model corresponding to google/gemma-4-26b-a4b, and confirm its Context Length is set according to that model's requirement.
After loading, you can first type a simple question on the Chat page. If it returns text normally, the model is available inside LM Studio.
Starting the OpenAI-compatible service
Go to the Developer page, find the local API Server area, and click Start server. The official LM Studio documentation notes that the local server can be started from the Developer page, and the default example port is usually 1234.
Confirm in Server Settings:
- Server Port is
1234, or note the port you actually set - Only enable Serve on Local Network when LAN access is needed
- A normal local Provider node can leave Require Authentication off; if enabled, you need to create an API Token and pass
--runtime-api-keyto the Provider Agent
The common LM Studio base URL is:
http://127.0.0.1:1234/v1By default, the local service does not require an API Key. If you enabled Require Authentication in Server Settings, use the corresponding token in your requests and in the Provider Agent startup parameters.
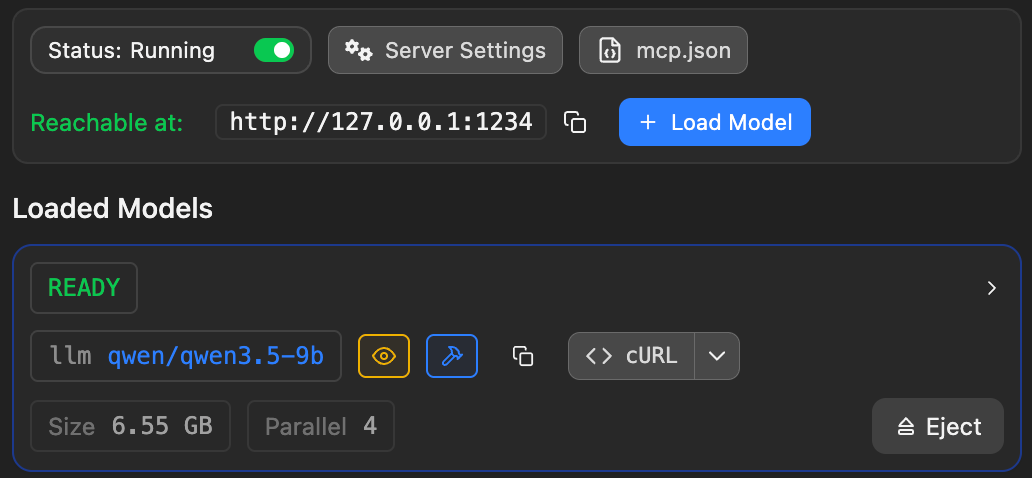
When the service starts correctly, the Developer page shows Status: Running, Reachable at gives the local access address, and the target model card shows READY. At that point, continue with the /v1/models and /v1/chat/completions verification below.
Verifying the LM Studio service
View the model list:
curl http://127.0.0.1:1234/v1/modelsDo a single non-streaming inference. Use the actual ID seen in /v1/models for model. Following this page's example, it is usually qwen/qwen3.6-35b-a3b:
curl http://127.0.0.1:1234/v1/chat/completions \ -H "Content-Type: application/json" \ --data-raw '{ "model": "qwen/qwen3.6-35b-a3b", "messages": [ { "role": "user", "content": "Reply in one sentence: the LM Studio service is available." } ], "max_tokens": 64, "temperature": 0.2 }'If authentication is enabled, add:
-H "Authorization: Bearer <LMSTUDIO_TOKEN>"Starting the Provider Agent
Once the LM Studio service is available, run the preflight first:
./token-provider-agent preflight start \ --model qwen3.6:35b \ --base-url http://127.0.0.1:1234 \ --api-format lmstudio \ --runtime-model-id qwen/qwen3.6-35b-a3bAfter the preflight passes, start it for real:
./token-provider-agent start \ --api-key stp-... \ --model qwen3.6:35b \ --base-url http://127.0.0.1:1234 \ --api-format lmstudio \ --runtime-model-id qwen/qwen3.6-35b-a3bIf LM Studio has Require Authentication enabled, also pass:
--runtime-api-key <LMSTUDIO_TOKEN>Command-line supplement
LM Studio also provides the lms command-line tool, suitable for advanced users who need automation scripts. Regular desktop users do not need it; if you want to troubleshoot model identifiers, you can use lms ls to view the local model list and lms ps to view models already loaded into memory.